Showing posts with label diy. Show all posts

Monday, November 5, 2012

A Pinterest board that I simply have to share

It's rare that I come across an entire Pinterest board that is so new to me that I go through it all. Lizzie Lynne's board, simply named "Stuffed", shows interesting and modern stuffed animals and tutorials for how to make many of them.


When we went trick-or-treating with August a lot of people I knew asked if I'd made our costumes, which indeed I had. My mother taught me how to sew and made all our costumes, which we then kept in a box to use for dress up throughout the year. And I actually still use her 1960's Singer machine that weighs 3 tons and only goes forwards and backwards, often skipping stitches. These people who asked generally responded with a shake of their heads, like I was crazy, and one mother said with a smile as she passed, "You put us all to shame".

Is that smile-worthy? Does she actually feel shame? I hope not. Yes, it is the era of store-bought costumes, because most people do not have the sewing machines nor the time, really the time, especially when children don't particularly feel like being a hobo, sheet ghost, or toilet paper mummy. Ah the good old days when we could keep it simple and sit back with a glass of wine waiting for the doorbell to ring. Of course in those days I wasn't the one at the door, I was the one dressed as princess or whatever, high on Snickers and lollipops, probably with a sticky mouth and cherry red lips.

I, however, have a sewing machine, and sewing makes me very calm. I rarely do it because I too do not have the time time time.

No one should feel ashamed of not being crafty. No one should be anything but joyous on Halloween. But if you DO have a sewing machine, if you DO like sewing, then maybe Miss Lizzie Lynne's Pinterest board will inspire you.

I'm going to make the Totoro doll.

Clockwise starting upper left:
1. Tattooed Man Doll by Mimi Kirchner on Etsy
2. Chipmunk from a glove from Imanualidades
3. Free rabbit template from Lark Crafts
4. Whale stuffies tutorial from Craftiness Is Not Optional (what a name!)
5. DIY Totoro plush tutorial from Cheek and Stitch
6. Bambak (what's that?) from Ladnebebe
Friday, November 2, 2012

Look what can be done with a banner!

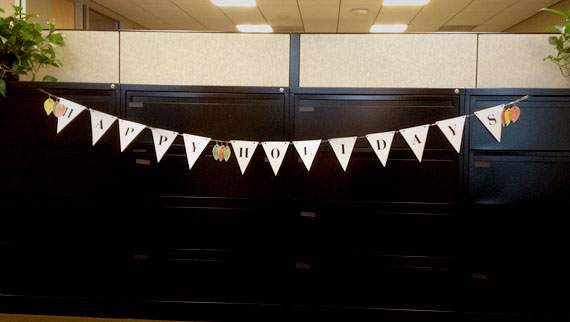
I'm always so excited to hear from readers and how they have made use of our stationery or, in this case, a free printable. The lovely Monica P. sent in this photo of a banner she made for her office using our free printable pennant banner:


She also added details of our free printable autumn leaves, which I never would have thought of:


She says she plans on using it for Christmas as well, jazzing it up with new seasonal decorations. 

See, we can make something for you, but you are the ones who make it unique. We hope to keep on creating things that you can take and make into your own.

Photos courtesy Monica P.

Wednesday, October 31, 2012

Last minute Halloween!

We didn't think there was going to be halloween trick-or-treating this year because of the hurricane/frankenstorm, but the community has spoken and it is ON. Bring it on. Which means us parents got nothin'.

So here are some last minute ideas. I have no idea what I'm going to make by 4pm.


Monday, October 29, 2012

Printable pennant banners II

Last week we had printable pennant banners that spotlighted how they can be used for weddings. However, if you think about it, you can use the same printable pennants for anything you like—decoration for any party, a sign for a nursery, or a welcome home banner for someone who's been away for far too long.

Download the Printable Pennant Banner in classic fonts here, or in modern fonts here


Print out the pennants on any color cardstock you like to coordinate with your color palette!

Materials needed:
Printer
Cardstock in any color you choose
Exacto knife or paper cutter
Hole punch
Ribbon or string

1. Download the customizable PDF of your choice, classic or modern.
2. Click on the pennant and type in your first letter
3. Print the page on a sheet of cardstock
4. Repeat with each letter in your banner
5. Cut out the pennants following the dotted gray outlines
6. Punch a hole in each upper corner
7. String a ribbon or twine through each letter—you can experiment with showing the ribbon in front or behind, and different kinds of ribbon (we used 3/8" satin for one, and baker's twine for the other)

Voila! Easy-peasy.


For personal use only. Do not sell or anything unethical like that. © aprintablepress 2012

Friday, October 26, 2012

Free Printable Pennants on A Practical Wedding

We have created a free printable (and customizable) Pennant Banner for that wondrous wedding blog A Practical Wedding:


For those who know me or know the wedding blog A Practical Wedding, you know that Meg and I have been fervid members of The Mutual Admiration Club, from way back when. Someday I might write an entire post just devoted to her.

But in the meantime, I wanted to give back to her and the amazingly sane community she has built at A Practical Wedding (a blog I followed myself when planning our wedding). So I suggested doing free printables just for them. And here is the very first one: Printable Pennant Banners!

See the post here for their wonderful and easy to follow instructions. Trust me, it's easy.
The downloadable and printable PDF is available in two fonts, classic and modern, to suit your style.

Copyright A Printable Press 2012, please don't resell or anything immoral like that


Wednesday, October 24, 2012

Make a little monster

A free printable just in time to make a little surprise for someone on Halloween. Just download, print on label paper (full sheet or 30 labels per sheet), cut out your features, and adhere to something. Make a Sandwich Bag Monster, an Orange Monster, or a Doorknob Monster! Go here for your Monsters Everywhere stickers.


Wednesday, October 10, 2012

Fingerprint creatures

I was looking up fingerprint fun, and came across an old post from the blog The Earth Is Our Teacher (sadly now defunct). The blogger, FroggyMama, shares pictures of the fingerprint creatures she made. And then her son got so excited by them he wanted to make some himeself.


Simple faces: 


More complicated faces:


 Animal faces:

Monsters!:

And her son's fingerprint people which are so kookily wonderful:


This would be a wonderful rainy day activity, it makes me excited for August to grow and grow and at least understand what a face is. Check out the post for suggestions on materials—I want the inks, I hadn't heard about them before.

All images from The Earth Is Our Teacher, 

P.S. if there was a way to contact FroggyMama I would, because I'd love to use those monster images in our upcoming quarterly! Anyone know her?

Thursday, October 4, 2012

Printable Autumn Leaves


You know how you always have a last minutes gift you have to wrap up, and you have the gift, but nothing special to wrap it with? Well here are some watercolor leaves for your autumn wrapping, special enough that you don't even need fancy paper or ribbon underneath. Download them here, and then just print, cut out, and punch a hole at the bottom. To make them even better I folded them down the middle and then curled the sides. Voila, write a note on the back and impress them. Without telling them how easy it is.

Tuesday, October 2, 2012


Once you have a kid you discover that your elegant, lovely and fun adult thank you cards just don't have the right feel for a gift given to your child. So I decided to make a thank you card where August could go wild. He's just learning to enjoy scribbling with crayons and dipping brushes into paint—although every color is still "yeyyow!"

Personalized, unique, guaranteed to make the recipient go, "Oh the cuteness!" If only I'd thought of this when he was a newborn, with those tiny hands smaller than baby monkey paws...

Just go here to download, click in the PDF to type in the name, print and cut. Then get out your paints and smock.


Thursday, August 30, 2012

1951 Hermés


I don't generally hold with simply reposting something you find on another site, but these were too good to for me to just pin them up on Pinterest. These are photos of an Hermés collection in 1951, photographed by the inimitable Gordon Parks. I have been getting increasingly attracted to messy trompe l'oeil, which from a first glance out of the corner of one's eye/oeil says "I am a classic 50's trenchcoat" but then on any direct eye/oeil contact says "Ha ha, made you look, I am in process." It transforms itself and its material into a sketchbook. Which is my favorite form of art—intimate, loose, implying an idea rather than wholly constructing it or elaborating on it. It's where the imagination has room to roam before it gets nailed to the wall and polished off. Like butterflies pinned to a board, that's what a lot of perfected finished art looks like to me. I want to imitate these dresses, it must be possible to pick up some cheap cotton frock from Target and zippity zip paint some swashy pockets and buttons on it. Or do something similar in another media, though I can't brainstorm anything offhand, my brain seems to be too slow at the moment. You think of something and tell me.

Found on the lovely design-conglomerating site Honey Kennedy

Thursday, August 16, 2012

My diy bulletin boards


I have always been attracted to those rolls of corkboard you see in hardware stores or 99 cent stores. What are they used for? Shelf lining? You can't use it as a bulletin board on its own, because if you stick it on a hard surface it's too thin for pushpins! They will fall out and litter your floor with danger and potential tetanus plus you will step on your photos and then be sad. But backing the cork with foamcore is perfect.

I long ago made the bear bulletin board, because our kitchen made echoes when you clapped. Sounds bounced from glossy cabinet to painted floor to hard plaster walls and made you feel like you were in a concrete hallway. One usually uses fabric, rugs or bookshelves to absorb sound, but in a kitchen? Ick. Cork was the answer.

As you can see, I haven't actually pinned up much on it—because August reaches out and pulls everything off. So all we have is our list of resolutions from New Year's, which is handy. We still do quite a lot of them! But we have yet to take August to the Bronx Zoo, and we realized he is not ready for car-camping. Sigh.

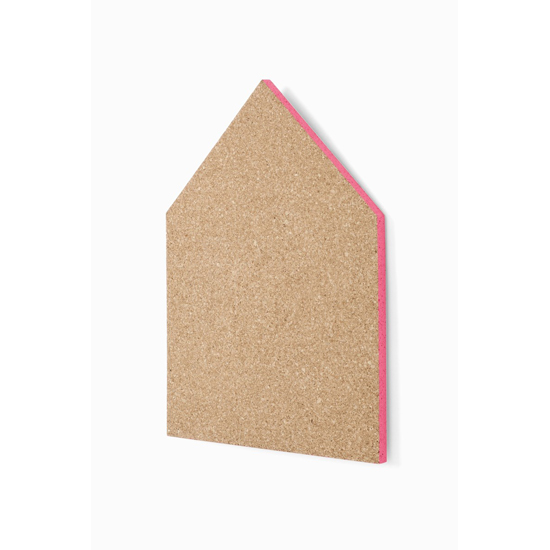
The house-shaped corkboard was inspired by this one by Ferm Living:
Ferm Living's board is significantly better, that pink trim is luscious and like summer nail polish, but I needed a board this week and was too itchy to wait for one to be shipped from Europe. And despite the little whisper of guilt in the back of my head I am so so happy to have a board up with my to-do's on it and newborn photo of my baby. He was born fuzzy.

I don't have any diy instructions, but it's easy—stick the cork-lining to a piece of foamcore, trace a shape you like on the back of the foamcore (don't forget to mirror it), then cut out with an exacto blade. if you want clean edges just angle your blade inwards and you will get a nice sharp look to your edges. That's it!

Photo of bottom corkboard courtesy Ferm Living